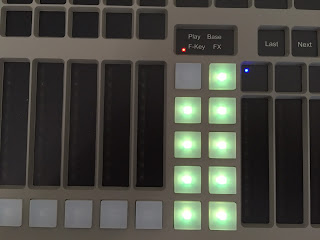
The M-Touch can be used for both programming and playback operations through its dedicated buttons and Force Touch faders. Just right of center on the M-Touch you will find two rows of buttons that can easily change their function as needed.
Before explaining the functions in detail, lets look at how you can change the mode of these buttons. At the top you will find a pad with four labels: Play, F-Key, Base, and FX. A red LED will indicate which mode is currently active. As you touch anywhere in this rectangular pad, the function (and LED) will toggle between two of the modes (Base/FX or Play/F-Key). To change to the second pair of options, simply press and hold in the rectangle area for 2 seconds.
When this section of the M-Touch is set to Base, then the 10 buttons map directly to the fixture attributes displayed in the Fixture Parameters screen. As you toggle between the various attributes, the four programming Force Touch faders will also change to control specific parameters of the selected light(s).
Note that in this mode the ten M-Touch buttons will only access attributes shown on the left row of the attributes in the Fixture Parameters screen. This means fixture specific parameters only. To access the attributes shown on the right side of the attributes section (FX, Grouping, Rate) you will have to toggle these M-Touch buttons to the FX mode.
Now the 10 buttons on the M-Touch are mapped to the FX attributes as shown in the Fixture Parameters screen. As you change between the buttons, the screen and programming fader purposes will change accordingly. Remember that in both the Base and FX modes, the M-Touch buttons are mapped to only one type (Base or FX) and are oriented from top-down left to right as if in one long list.
When these buttons are placed in the Play mode, they act as an additional 10 playbacks per page! These are very similar to the Playback Pairs on the M6 or the quick playbacks on the M1. You can store, edit, modify and playback anything here. Note that you can press and hold the Select button on the left side of the M-Touch and then press any of these 10 playback buttons to select as the main cuelist.
The F-Key functionality of the M-Touch allows these 10 buttons to map to the first 10 Programmable Buttons you have assigned. This is great for changing views selecting groups, presets, banks or many other commands. Just like with a console, you can press and hold Edit on the M-Touch and select a F-Key to edit its ability.
I love how quick and easy it is to change the mode of these 10 buttons. You can easily assign them to many different purposes and toggle as needed during your workflow. With these buttons and more, the Martin M-Touch is a very affordable and extremely useful controller. And don't forget that it can be used with M-PC as well as any of the M-Series controllers.


Hi Brad
ReplyDeleteHow are you?
If you want I could translate to Spanish
Hi Brad,
ReplyDeleteI have just purchased the M-touch and the M-PC 2U. I would love to use them in MSD6 lite to build the lighting for a show I'm working on.
If I'm correct I have licences for 2 universes. I believe I read somewhere that I have 180 day trail use of MSD6 when I purchased the Mtouch and MPC2U. Is that correct?
Hello...
DeleteThe M-Touch and MPC2U do not contain the MSD trial. Only products with a One-Key allow for this.
Hello, I am sorry for my lack of knowledge, but do I need a license key in order to use an M-Play with the M-Pc software?
ReplyDeleteThank you
need to get used with it, it's fun
ReplyDelete